Saturday, May 23, 2009

Elmo Invite


Today's post is going to be short and sweet since we are leaving for a camping trip in just a couple hours!

My 20month old will be turning 2 in September, and so I wanted to get hopping on all the decor and invites now (I am just trying to be prepared... okay, I am just a really eager person! :)

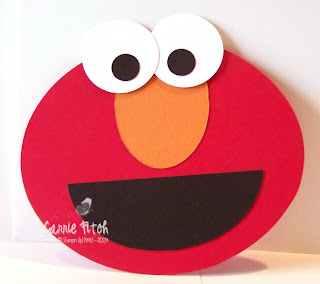
Braden (my son) absolutely adores Elmo. But what toddler doesn't? He calls him his "Mo-mo". So, so cute! I plan on making his birthday cake to match the project seen here. I am thinking about just attaching the invite specifics to the back of Elmo's head. Or I might use it as piece on a bigger card.

This couldn't have been easier to make. I cut out a large oval (using the Coluzzle cutting system) out of Real Red. I cut a smaller oval out of Basic Black, and cut it in half. This was attached as his mouth. An even smaller oval was cut out of Pumpkin Pie and attached as his nose. A 1 3/8" Circle punch was used to cut the eyes out of Whisper White and a 1/2" circle punch cut out the Basic Black for the centers. Both eyes were attached using dimensionals. Cute, right?

Did you know that May is National Scrapbook month? For the month of May, Stampin' Up! is offering a Buy 3 get 1 FREE on all 12x12 Designer Series paper and textured card stock! Also in honor of May, get the brand new sneak peek Jumbo Alphabet set at 20% off! Click Here for details!

Right now you can join Stampin' Up! for only $75!!! Click here for details!

Happy Stampin'!
Carrie

Order Stampin' Up! online 24-7! Click Here!


Recipe:
Stamps: None
Ink: None
Paper: Real Red (102482), Whisper White (100730), Basic Black (102851), Pumpkin Pie (105117)
Accessories: Coluzzle Cutting System (no longer available from SU), 1 3/8" Circle Punch (104401), 1/2" Circle Punch (104390), Stampin' Dimensionals (104430)

Friday, May 22, 2009

OCC Color Challenge

Today's color scheme was inspired by Our Creative Corner: use Bashful Blue, Certainly Celery, Regal Rose, and a neutral. And since the butterfly image was stamped several times, it qualifies it for the Splitcoast "Ways To Use It" challenge WT219: Repeat Stamp images.

This 4"x7" Whisper White card base is mostly covered by a textured piece of Bashful Blue. I don't like ribbons or brads to show through to the inside of the card, so I actually adhered this piece last to attach accessories.

A 1" strip of dotted bashful DSP (SAB Freebie) was added to the middle of the card, along with a piece of Whisper White Taffeta Ribbon.

The sentiment (inked in Black StazOn) and stem (inked in Certainly Celery) are both from Great Friend. They were stamped in the lower right corner of the card. Two white jumbo brads were attached to the upper left. TIP: The jumbo brads can be a little tricky to line up. What I do is take the foam mat from the crafter's toolkit and place it underneath card stock. I simply pushed the first brad through the paper and into the mat. While the brad is still stuck into the mat, I pushed through the second one. Voila!

The scallop circle punch was taken to Regal Rose 3 times. A 1 3/8" circle punch was used for the Certainly Celery centers. Three 2x2" window sheet squares were all embossed using a Versamark pad, Irridescent Ice EP, and a heat tool. Then they all took a trip through my Big Shot using the Beautiful Butterflies die (the smallest butterfly). I LOVE the way these came out. Shimmery, yet see-thru.

The butterfly image, from Great Friend, was inked and stamped in Regal Rose onto Whisper White. Two more butterflies were stamped onto Whisper White using Bashful Blue. All three were snipped out and adhered to the embossed window sheets using glue dots. More glue dots were used to hold down the butterflies to the card. The centers of each butterfly are dotted with clear rhinestones, taken from clear rhinestone brads. I got this idea from my upline, Mary Fish at Stampin' Pretty. Here is here post. I used the pliers from my crafters toolkit to pull apart the prongs on the brad and then the rhinestone just popped out! Glue dots hold them down in the centers of my butterflies. Pretty cool, huh?

Did you know that May is National Scrapbook month? For the month of May, Stampin' Up! is offering a Buy 3 get 1 FREE on all 12x12 Designer Series paper and textured card stock! Also in honor of May, get the brand new sneak peek Jumbo Alphabet set at 20% off! Click Here for details!

Right now you can join Stampin' Up! for only $75!!! Click here for details!

Happy Stampin'!
Carrie

Order Stampin' Up! online 24-7! Click Here!

Recipe:
Stamps: Great Friend (113792)
Ink: Regal Rose, Bashful Blue (105209), Certainly Celery (105217), Black StazOn (101406), Versamark (102283)
Paper: Whisper White (100730), Soft Subtles Textured (108695), Dots DSP (SAB), Regal Rose (105130)
Accessories: 5/8" Jumbo brads (112533), Clear Rhinestone brads (113114), Whisper White Taffeta Ribbon (109070), Window Sheets (114323), Big Shot (113439), Beautiful Butterflies (114507), Scallop Circle Punch (109043), 1 3/8" Punch (104401), Crafter's Toolkit (104310), Glue Dots (103683), Heat Tool (100005), Irridescent Ice embossing powder (101930)

Wednesday, May 20, 2009

Real Summer Turquoise Trees!

You might remember my post last week with the pink owl. Well I liked the idea of using non-traditional colors so much that I did it again this week- with trees!

My color scheme this week includes Real Red, Tempting Turquoise, and Summer Sun- all in honor of Memorial Day. These can be patriotic colors, right? I also used an older Splitcoast Sketch (139-below)

My Whisper White card base was partially covered with a harlequin textured piece of Real Red. TIP: Adding the texture was so easy with my Big Shot and SU Backgrounds Texturz plate! A large Tempting Turquoise rectangle was matted in Summer Sun and adhered to the center portion of the card. A small strip of Summer Sun Good Morning Sunshine DSP was added to make the sentiment pop (added last using a Stamp-a-ma-jig).

Three Trendy Tree trunks were inked up in Tempting Turquoise and Real Red then stamped onto a scrap of Whisper White. The foliage was stamped next using a stamp-a-ma-jig, Summer Sun and Tempting Turquoise ink. They were all trimmed out using paper snips. The larger tree was popped up onto a rectangle of the Good Morning DSP and matted onto Tempting Turquoise. The other two trees were adhered directly onto the card.

A 5/8" Real Red Grosgrain ribbon was wrapped around the lower portion of the red cardstock, leaving two long tails. Next I took my 1/2" circle punch and popped out a circle from Summer Sun. Then I grabbed my 1 3/8" punch to pop out a circle around the smaller one (like a doughnut). TIP: This works so much easier if you punch the smaller one first so that you can center it easily when punching the larger one (hold it upside down when punching). The new Jumbo Grommets (Occasions Mini) are so fun and easy to use. I used a silver one here. The 1/2" Circle punch creates a perfectly sized opening for the grommet. I simply pushed it through the opening, flipped it over and used a bone folder to push back the prongs. The ribbon was pulled through on either side until it was snug, and then I attached the grommet/circle with dimensionals. The ribbon was tied in a simple knot and trimmed. The finishing touch? Tiny holes around the outside edges were made using my paper piercer, template, and foam mat (all included in the crafter's toolkit!).

Happy Stampin'!
Carrie

Shop Stampin' Up! online 24-7! Click Here!


Recipe:
Stamps: Trendy Trees (113258)
Ink: Summer Sun (100537), Real Red (103133), Tempting Turquoise (100814)
Paper: Whisper White (100730), Real Red (102482), Tempting Turquoise (102067), Summer Sun (103124), Good Morning Sunshine DSP (113966)
Accessories: Stamp-a-ma-jig (101049), Dimensionals (104430), Crafter's Toolkit (104310), SU Backgrounds Texturz Plate (114512), Big Shot (113439), 5/8" Real Red Grosgrain Ribbon (109052), 1 3/8" Circle Punch (104401), 1/2" Circle Punch (104390), Basic Jumbo Grommets (114348), Bone Folder (102300)

Tuesday, May 19, 2009

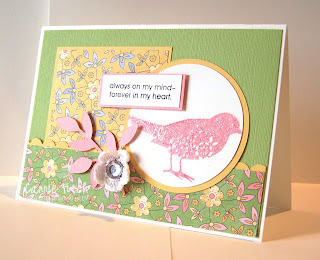
Always on my mind...

Today's card was made using Mojo Monday Sketch 87 (below). I love the softness of Tea Party DSP. I used two patterns from the set, along with Certainly Celery, Pretty in Pink, and So Saffron (perfect matches!).

The Whisper White card base was covered with a layer of textured Certainly Celery. TIP: I stocked up big time on 12x12 textured card stock using the May Scrapbook promotion Buy 3 Get 1 FREE!

A 3x3 Saffron floral (also from Tea Party) was matted onto a slightly larger square of So Saffron and adhered to the card first. The mostly green print from Tea Party was given a So Saffron scalloped border and adhered next. Using my Circle Scissors Plus and Glass Cutting Mat, I cut two circles. One out of Whisper White, and another out of So Saffron. TIP: I moved the dial to a slightly larger circle for the So Saffron.

I inked up the bird, from Always, in Pretty in Pink and stamped it onto the white circle. Using my Stamp-a-ma-jig, I lined up the bird again and stamped it using Versamark. The image was then embossed with Irridescent Ice EP, and a heat tool.

The sentiment, also from Always, was inked in Black StazOn and stamped onto a rectangle of Whisper White. It was matted in Pretty in Pink and adhered with Stampin' Dimensionals.

I just received the SU Little Leaves Sizzlet in the mail yesterday and had to use it on this project! I ran the die through my Big Shot with Pretty in Pink textured card stock. More dimensionals were used to pop it off the card. TIP: I cut up the hexagons to make smaller shapes that would not show off the sides. Using a glue dot, I adhered a Fleurette Flower, but I didn't like that the center was Riding Hood Red (for obvious reasons!). So I found a gemstone sticker (non SU) to cover the center.

Right now you can join Stampin' Up! for only $75!!! Click here for details!

Happy Stampin'!
Carrie

Order Stampin' Up! online 24-7! Click Here!


Recipe:
Stamp Set: Always (113620)

Ink: Pretty in Pink (101301), Versamark (102283), Black StazOn (101406)
Paper: Whisper White (100730), Soft Subtles Textured (108695), So Saffron (105118), Tea Party (113992)
Accessories: Stamp-a-ma-jig (101049), Circle Scissors Plus (112530), Glass Cutting Mat (112531), Big Shot (113439), Little Leaves (114511), Fleurette (114019), Stampin Dimensionals (104430), Scallop Edge punch (112091), Irridescent Ice embossing powder (101930), Heat Tool (100005), Glue Dots (104183)


Saturday, May 16, 2009

Pacific Tangerines and Kiwis

This card is definitely clean and simple. I love the crisp look of Pacific Point, Kiwi Kiss, and Tangerine Tango contrasting against each other.

This Pacific Point card base is 5 1/2" square. Using my Circle Scissors Plus and Glass cutting mat, I cut out three circles- 2 in Kiwi Kiss, and 1 in Tangerine Tango. TIP: To create the ring, I used Dotto Removable adhesive to hold down my Kiwi Kiss card stock. I cut one circle, and leaving the paper and cutter in the same position, I moved the dial to a slightly larger circle to cut the ring. The Kiwi ring and Tangerine Circle were adhered to card first, slightly overlapping.

A wide strip of Tangerine Tango was covered with a thinner strip of Whisper White that was repeatedly stamped with the stems from Central Park. A piece of Kiwi Kiss/Very Vanilla Satin Ribbon hide the top seam on the paper.

The Soho Designer Hardware piece was attached to a circle (punched out using the 1 3/8" punch) of Pacific Point using a Crop-a-dile. TIP: The back of the designer hardware has instructions for attachment using a Crop-a-dile. This was then adhered to the other Kiwi Kiss circle (see above). Lastly, this piece was layered onto the Tangerine circle.

The sentiment, from Trendy Trees, was inked in Black StazOn and stamped onto Kiwi Kiss. It was then popped out using the Word Window punch. Two silver Jumbo Brads were adhered in the upper left of the card. TIP: I like for the inside of my cards to be "clean", meaning no ribbon or brads showing through. To accomplish this in this case, I did not attach the brad in a traditional way. I fanned it out first, clipped off the metal pieces that were sticking off the sides (using my Craft and Rubber scissors) and attached them with glue dots.

Did you know that May is National Scrapbook month? For the month of May, Stampin' Up! is offering a Buy 3 get 1 FREE on all 12x12 Designer Series paper and textured card stock! Also in honor of May, get the brand new sneak peek Jumbo Alphabet set at 20% off! Click Here for details!

Right now you can join Stampin' Up! for only $75!!! Click here for details!

Happy Stampin'!
Carrie

Order Stampin' Up! online 24-7! Click Here!


Recipe:
Stamp Sets: Central Park (113732), Trendy Trees (113258)
Ink: Black StazOn (101406), Kiwi Kiss (111835)
Paper: Pacific Point (111350), Tangerine Tango (111349), Kiwi Kiss (111353), Whisper White (100730)
Accessories: Soho Designer Hardware (114350), 5/8" Jumbo Brads (112533), Kiwi Kiss/Very Vanilla Satin Ribbon (111879), Circle Scissors Plus (112530), Glass Cutting Mat (112531), Word Window punch (105090), Crop-a-dile (108362), Glue Dots (104183), Craft and Rubber Scissors (103179)

Friday, May 15, 2009

Altered Tin using soon to-be-retired In-Colors!

As I mentioned in an earlier post, I plan on using the In Colors as much as possible in the coming month. All inks, card stock, and accessories featuring an In Color will retire after July 30th!

One of my favorite things to do is alter tins to give away as gifts. Click Here to view a previous post using the same Accents and Elements tin.

For this project, I grabbed my Big Shot and Flower Layers die. I ran the die through my machine a few times alternating between Riding Hood Red and Pink Pirouette. TIP: Because this is a steel rule die it can cut through multiple layers of card stock at one time. I assembled 7 flowers from these for my cards, tin, and paperclip. A clear rhinestone (non SU) dotted the centers of 5 of the flowers for each card. Using the build-a-brad kit, my 1/2" circle punch, and the polka-dotted Kiwi Kiss (Rockabilly DSP), I created a center for the flower on the front of the tin.

The background paper for the tin (cover, and inside) are also from Rockabilly DSP.

To create the leaves for the flowers, I used my 5-Petal flower punch to cut out flowers in Kiwi Kiss. The were then cut apart to mimic leaves. The stem swirls were created using my Big Shot and the Swirls Scribbles Sizzlet.

The sentiment and stem are from Great Friend (Occasions Mini). The stem was inked in Kiwi Kiss and stamped repeatedly on the left portion of a Whisper White rectangle. The sentiment was inked in Ruby Red (a close match to Riding Hood Red). It was then matted in Urban Oasis DSP and attached using Stampin' Dimensionals. A Riding Hood Red/Pink Pirouette Fleurette was attached last, along with a Bouquet Button.

Each card (3x3" Whisper White) got a strip of Rockabilly polka dot paper, a flower and some leaves. The inside of each card was stamped with a stem and "For You". I also finished off the back of each envelope. The final piece is a Jumbo Paperclip with the last flower attached only to the top using dimensionals.

This tin has many purposes. It's initial purpose is to hold and organize cards. Once all the cards are given away it can be re-gifted to hold a gift card!

Did you know that May is National Scrapbook month? For the month of May, Stampin' Up! is offering a Buy 3 get 1 FREE on all 12x12 Designer Series paper and textured card stock! Also in honor of May, get the brand new sneak peek Jumbo Alphabet set at 20% off! Click Here for details!

Right now you can join Stampin' Up! for only $75!!! Click here for details!

Happy Stampin'!
Carrie

Order Stampin' Up! online 24-7! Click Here!


Recipe:
Stamps: Great Friend (113792)
Ink: Kiwi Kiss (111835), Ruby Red (102259)
Paper: Urban Oasis DSP (113978), Rockabilly DSP (114039), Riding Hood Red (111348), Pink Pirouette (111351), Kiwi Kiss (111353), Whisper White (100730)
Accessories: Big Shot (113439), Swirls and Scribbles (113431), Flower Layers (113458), Build-a-brad (109128), 1/2" Circle Punch (104390), Stampin' Dimensionals (104430), Fleurettes (114019), Button Bouquet (112092), Mini Square Envelopes (107309)

Thursday, May 14, 2009

A Pink Owl? Hmm...

Yep. That is right. A pink owl. Just because owls aren't really pink, doesn't mean they can't be in your stamping creations!

This card layout is from Our Creative Corner (below). I also used a photo of child bedding from Pottery Barn (below) for color/pattern inspiration.

This Whisper White card base was mostly covered by a piece of Regal Rose, and another piece of Tempting Turquoise. The turquoise was first dry embossed using the Cuttlebug Birds and Swirls embossing folder and my Big Shot. TIP: The multipurpose platform that comes with the Big Shot has instructions for using embossing folders as well as other manufacturers dies!

Two strips of Rockabilly DSP were matted with Regal Rose and attached next. Two small filigree brads were attached in the upper left, in keeping with the sketch.

Two ovals were cut out using my Coluzzle and oval template. The smaller one is Whisper White, and the larger one in Regal Rose. Using Tempting Turquoise and Regal Rose markers, I filled in the owl from Forest Friends, being careful not to color the branch. This was stamped on the white oval along with the sentiment (from Cheep Talk).

This adorable branch is from On Board So Tweet. I covered this with more Rockabilly DSP. TIP: A sanding block helped make all the edges smooth. I punched out the flowers (retired SU punch) out of Regal Rose, and a dot of Chocolate Chip made up the centers.

Did you know that May is National Scrapbook month? For the month of May, Stampin' Up! is offering a Buy 3 get 1 FREE on all 12x12 Designer Series paper and textured card stock! Also in honor of May, get the brand new sneak peek Jumbo Alphabet set at 20% off! Click Here for details!

Right now you can join Stampin' Up! for only $75!!! Click here for details!

Happy Stampin'!
Carrie

Order Stampin' Up! online 24-7! Click Here!


Recipe:
Stamp Sets: Forest Friends (113748), Cheep Talk (113204)
Ink: Regal Rose (105108), Tempting Turquoise (100058), Chocolate Chip (100071)
Paper: Whisper White (100730), Regal Rose (105130), Tempting Turquoise (102067), Rockabilly DSP (114039)
Accesories: Filigree Brads (112577), On Board So Tweet (113093), Sanding Blocks (103301), Big Shot (113439), Coluzzle (no longer available from SU), Flower Punch (retired)


Wednesday, May 13, 2009

Mojo Wednesday... ?

Well actually this is for Mojo Monday Sketch 86 (below). I wanted something crisp and clean. Kiwi Kiss, Summer Sun, and Tangerine Tango seemed to do the job!

You will likely see more of the In Colors being used in my projects in the coming month. These colors (along with any accessories that use them) will be retired when the new catalog comes out in July. Stock up now because they will not be offered again! And what better time to stock up anyway with the Buy 3 Get 1 Free promo going on?

My card started with a Tangerine Tango base that was paper pierced at the bottom using the crafter's toolkit. Next a wide strip of Good Morning Sunshine DSP and matching Kiwi Kiss border (using the scallop edge punch) were added. Kiwi Kiss/Very Vanilla Satin ribbon hides the paper seam at the top.

All of the images are from Bright Delights (rub-ons). They easily adhered to the Whisper White card stock and were layered onto Summer Sun. The center pear was popped up on dimensionals, while the side images were each given a little Kiwi Kiss flower button from Button Bouquet. TIP: A sliver of Chocolate Chip card stock was used versus thread on the buttons.

Did you know that May is National Scrapbook month? For the month of May, Stampin' Up! is offering a Buy 3 get 1 FREE on all 12x12 Designer Series paper and textured card stock! Also in honor of May, get the brand new sneak peek Jumbo Alphabet set at 20% off! Click Here for details!

Right now you can join Stampin' Up! for only $75!!! Click here for details!

Happy Stampin'!
Carrie

Order Stampin' Up! online 24-7! Click Here!


Recipe:
Stamp Set: None
Ink: None
Paper: Tangerine Tango (111349), Kiwi Kiss (111353), Summer Sun (103124), Whisper White (100730), Good Morning Sunshine Designer Series Paper (113966), Chocolate Chip (102128)
Accessories: Scallop Edge Punch (112091), Button Bouquet (112092), Bright Delights (113887), Crafter's Toolkit (104310), Stampin Dimensionals (104430), Kiwi Kiss/Very Vanilla Satin Ribbon (111879)

Monday, May 11, 2009

Kwerner meet Splitcoast...

These are not typical colors that I would choose, but I love them together! That is what is so great about Kwerner Design Color Inspirations. Chocolate Chip, Rose Red, More Mustard, and Whisper White were the colors used to comply with challenge #51.

This week I decided to also use the SplitCoast Sketch #227 (below).

The More Mustard card base was first covered in Rose Red, and then Chocolate Chip Good Morning Sunshine DSP. A paper pierced (using the crafters tool kit) band was placed on the lower have of the card. Another smaller strip of Chocolate Chip took a trip through my paper crimper and was adhered next. Two white Jumbo Brads were then adhered.

A large rectangle of Rose Red was clipped on one side using the Scallop Border punch. Next I took slightly smaller rectangle of More Mustard, and repeatedly stamped the flower image (from Cheep Talk) in Versamark. The images were then Clear embossed using a heat tool. Each flower got a silver brad center before the piece was adhered to the Rose Red.

The sentiment is actually a rub-on from Bright Delights. It was rubbed onto an oval in Whisper White. TIP: I used my Coluzzle (no longer available from SU!) for this, but the wide oval punch would have worked perfectly. I had an oval chipboard piece (non-su) that I covered and sanded in Rose Red. The two ovals look great when layered. A small Rose Red felt flower (Flower Fusion) was added with a brad to give the sentiment more 'pop'.

I challenge you to try this combination!

Did you know that May is National Scrapbook month? For the month of May, Stampin' Up! is offering a Buy 3 get 1 FREE on all 12x12 Designer Series paper and textured card stock! Also in honor of May, get the brand new sneak peek Jumbo Alphabet set at 20% off! Click Here for details!

Right now you can join Stampin' Up! for only $75!!! Click here for details!

Happy Stampin'!
Carrie

Order Stampin' Up! online 24-7! Click Here!


Recipe:
Stamp Set: Cheep Talk (113204)
Ink: Versamark (102283)
Paper: Good Morning Sunshine DSP (113966), Whisper White (100730), More Mustard (100946), Chocolate Chip (102128), Rose Red (102544)
Accessories: Flower Fusion (110720), Crafters Toolkit (104310), Paper Crimper (101618), Scallop Border Punch (112091), Jumbo Brads, (112553) Silver Brads (104336), Clear Embossing Powder (109130), Heat Tool (100005), Bright Delights (113887)


Sunday, May 10, 2009

Mother's Day Birdhouse

Isn't this little birdhouse adorable!? I wish I could take credit for the concept, but I actually got the idea from Jen Del Muro at Stamp a Sweet Impression. You can view a complete tutorial and see her house on her blog by clicking here.

I mostly followed the instructions on Jen's blog, but I did make a few adjustments. First, I don't have an oval punch (I know, I know... I need one!). So I used Chocolate Chip strips that I punched with the Scallop Border punch.

I wanted to make my house into a bird house, so before assembling the house I used my 1 3/8" circle punch to make a hole. TIP: I needed to go in from the side in order for the punch to fit. Even then, I needed to trim off about half of the flap to make it work. You could always use your Circle Scissors Plus to make the hole. I backed the circle with a medium window sheet (Occasions Mini). To create the scallop border, I first punched a circle out of Pink Pirouette, I then punched the scallop circle. This ensured that the circle would be centered.

I decided not to glue the top of the house together. Instead I punched a hole into the top of each triangle so that I could tie it all together. This way my mom (the recipient of this gift for Mother's Day), can get her goodies out and then reuse the house or display it.

I decorated the house with flowers (using the Trio Flower Punch), grass, and bee/butterfly buttons (non-SU!). The little bird is from Cheep Talk. I filled it in with Pacific Point and Pumpkin Pie before stamping and snipping it out. He is adhered with a dimensional.

A Chocolate Chip marker was used to write "Home Sweet Home", and also to create little dots for the insects :).

I plan to fill this little house with some Chocolate Covered Almonds. YUM!

Did you know that May is National Scrapbook month? For the month of May, Stampin' Up! is offering a Buy 3 get 1 FREE on all 12x12 Designer Series paper and textured card stock! Also in honor of May, get the brand new sneak peek Jumbo Alphabet set at 20% off! Click Here for details!

Right now you can join Stampin' Up! for only $75!!! Click here for details!

Happy Stampin'!
Carrie

Order Stampin' Up! online 24-7! Click Here!

Recipe:
Stamp Set: Cheep Talk (113204)
Ink: Pacific Point (111837), Pumpkin Pie (105115), Chocolate Chip (100071)
Paper: Kraft (102125), Chocolate Chip (102128), Whisper White (100730), Riding Hood Red (111348), Old Olive (100702), Pink Pirouette (111351)
Accessories: Scallop Border Punch (112091), Trio Flower Punch (109183), Stampin Dimensionals (104430), Window Sheets (114323), Scallop Circle Punch (109043), Hemp Twine (100982), Pearl Stickers (Non-SU), Buttons (Non-SU)


Saturday, May 9, 2009

Mojo Monday- It's Black and White (and red)

I am finally getting around to posting this card... We have had a terrible cold running through our house so I haven't really been up for much creating. Needless to say it was one of the first things I did when I felt better!

I have been wanting to use this color scheme (Black/White/Gray/Red), for quite some time. I decided that this weeks' Mojo Sketch (below) would be perfect for it.

The card has a Whisper White base, with the bottom third covered in Basic Gray. On the left side of the card I stamped the branch from Eastern Blooms in Whisper White Craft ink onto Basic Black. TIP: I used a heat tool to set the ink. A strip of Real Red scallops (using the Scallop Edge Punch) creates a nice transition from the black design to the rest of the card.

The basic black and gray designer series paper is from Urban Oasis. It was layered onto a piece of Basic Black.

Eastern Blooms images created the focal point. The large flower was inked in Black StazOn and stamped onto Whisper White. TIP: I prefer to use StazOn vs. the Basic Black because it is more concentrated. Another bloom from the set was inked in VersaMark and stamped onto Real Red. It was then embossed with clear EP and set with the heat tool. The flower was trimmed out and layered onto the black blossom with a Stampin' Dimensional. A fire red rhinestone brad creates the center of the flowers.

The sentiment (from Absolutely Fabulous), was inked in white craft ink and stamped into the lower right of the card. Real Red Grosgrain ribbon ties it all together :).

Did you know that May is National Scrapbook month? For the month of May, Stampin' Up! is offering a Buy 3 get 1 FREE on all 12x12 Designer Series paper and textured card stock! Also in honor of May, get the brand new sneak peek Jumbo Alphabet set at 20% off! Click Here for details!

Right now you can join Stampin' Up! for only $75!!! Click here for details!

Happy Stampin'!
Carrie

Order Stampin' Up! online 24-7! Click Here!


Recipe:
Stamp Sets: Absolutely Fabulous (114914), Eastern Blooms (111626)
Ink: Black StazOn (101406), Whisper White Craft (101731), Versamark (102283)
Paper: Urban Oasis DSP (113978), Whisper White (100730), Basic Black (102851), Basic Gray (108692), Real Red (102482)
Accessories: Scallop Border Punch (112091), Real Red Grosgrain Ribbon (109034), Heat Tool (100005), Clear Embossing Powder (109130), Stampin' Dimensionals (104430)


Sunday, May 3, 2009

Tweet Tweet!! Pacific Bird

This brightly colored card was made a long time ago and I just realized I hadn't posted it. It was the result of a Card Positioning Systems challenge- 108.

The card base is Summer Sun, with a textured piece of Pacific Point. To create the texture, I used an SU Background I Texturz Plate and my Big Shot. TIP: To create a deeper impression, I wedged another piece of card stock on the outside of my "sandwich".

Two strips of Summer Sun frame the bird on top and on the side. One of the strips was given a little extra attention by adding a Bright Delight Rub-on border.

The main image was created by first stamping the branch image, from Cheep Talk, in Kiwi Kiss onto Whisper White. The bird was inked in Pacific point, and then using a baby wipe I removed the ink from the feet and beak. SU Markers in Summer Sun and Chocolate Chip were used to fill in those areas. Using a stamp-a-ma-jig I was able to place the bird on top of the branch, and it was also used to place the sentiment below it.

Summer Sun Good Morning Sunshine DSP was used as a backdrop for my bird, and three buttons in Kiwi Kiss and Chocolate Chip were added at the bottom.

May is National Scrapbooking Month! Because of this, Stampin' Up! is offering an amazing promotion. Buy three packs of Designer Series paper (including Specialty Designer Series paper) or 12" x 12" textured card stock, and get one FREE! Click here to get started!

Also in the month of May, you can join the Stampin' Up! family for as little as $75!!! Ask me how!

Happy Stampin'!
Carrie

Order Stampin' Up! online 24-7! Click Here!


Recipe: Stamp Set: Cheep Talk (113204) Ink: Pacific Point (111837), Summer Sun (100537), Chocolate Chip (100908) Paper: Summer Sun (103124), Whisper White (100730), Pacific Point (111350), Good Morning Sunshine DSP (113966) Accessories: Big Shot (113439), Texturz Plates SU Backgrounds I (114512), Button Bouquet (112092), Button Latte (114333), Hemp Twine (100982), Bright Delights Rub-ons (113887), Stamp-a-ma-jig (101049)

Saturday, May 2, 2009

A great friend and some chocolate... all a girl needs!

I have had the Matchbox Bigz XL Die for quite some time now, and this is my first posting using it. Aaahh! Where has the time gone?

This was the make-and-take at my last workshop. I can't emphasize enough what a breeze this was to make! The Matchbox die not only cuts out the box and sleeve, but it also makes the score lines! Amazing.

I simply ran Whisper White with the die through my Big Shot for the box portion. I then ran some Raspberry Tart DSP through for the sleeve. TIP: you will want to only die cut one sheet of card stock or paper at a time with the Matchbox die. This will ensure that the score lines will show up.

The sentiment and frame is from Great Friend (Occasions Mini). I first stamped the frame onto Whisper White using Kiwi Kiss ink. Then, using a Stamp-a-majig, I stamped the sentiment. I inked the sentiment using SU markers in Cameo Coral and Basic Black.

A piece of Certainly Celery ribbon (SAB Freebie) keeps the box from sliding out.

4 Hershey's Nuggets fit perfectly inside. I simply used a little more Raspberry Tart to dress them up.

Think wedding/shower/birthday favors! Cool, huh?

May is National Scrapbooking Month! Because of this, Stampin' Up! is offering an amazing promotion. Buy three packs of Designer Series paper (including Specialty Designer Series paper) or 12" x 12" textured card stock, and get one FREE! Click here to get started!

Also in the month of May, you can join the Stampin' Up! family for as little as $75!!! Ask me how!

Happy Stampin'!
Carrie

Order Stampin' Up! online 24-7! Click Here!

Recipe: Stamps: Great Friend (113792) Ink: Kiwi Kiss (111835), Basic Black (100082), Cameo Coral (100074) Paper: Raspberry Tart (113975), Whisper White (100730) Accessories: Certainly Celery Ribbon (SAB Freebie), Matchbox Bigz XL Die (114890), Big Shot (113439), Stamp-a-majig (101049)

Friday, May 1, 2009

Same Images and Layout- Different Cards

I demonstrated at a work shop last week, and these were two of the cards that I showed. My goal was to show how beautifully Stampin' Up! products coordinate with each other, and also show how a simple and beautiful design can be taken to the next level.

The first card uses basic stamping techniques and a simple layout. A Whisper White base was first covered in Chocolate Chip, with another layer of Whisper White. This top layer was stamped, just in the lower left corner with images from Fifth Avenue Floral. TIP: I like the look of the lines overlapping each other, but you could use a masking technique to achieve a different look. The flowers were inked in Pink Passion and Kiwi Kiss.

Strips of Pink Passion and Kiwi Kiss dress up the left side of the card. Three Pink Passion flowers were cut out using the Trio Flower Punch. To mix things up a bit, I added a Kiwi Kiss flower button (from Button Bouquet). TIP: A sliver of card stock is an inexpensive way to have a variety of "thread" :).

Another piece of Whisper White was stamped using another flower from Fifth Avenue Floral and Kiwi Kiss ink. This serves as a backdrop to the sentiment. Another Pink Passion Trio flower adds extra color to the top portion of the card.

The next card that I made uses the same images and layout. But the result is quite a bit different and this card was much easier to assemble. The color scheme used here is Pink Pirouette, Chocolate Chip, and Whisper White. The images were created using the Textured Impressions Manhattan Flower Die and my Big Shot. I love how deep the impressions are! So elegant. TIP: You can emboss the card as is, or you can fill in the image with color as seen here.

The sentiment was added to the top right corner, just as it was with the previous card. A Chocolate Chip Taffeta Ribbon finishes off the left side.

What do you think?
May is National Scrapbooking Month! Because of this, Stampin' Up! is offering an amazing promotion. Buy three packs of Designer Series paper (including Specialty Designer Series paper) or 12" x 12" textured card stock, and get one FREE! Click here to get started!

Also in the month of May, you can join the Stampin' Up! family for as little as $75!!! Ask me how!

Happy Stampin'!
Carrie

Order Stampin' Up! online 24-7! Click Here!

Recipe for Stamped Card: Stamps: Fifth Avenue Floral (113734) Ink: Pink Passion (101212), Kiwi Kiss (111835) Paper: Whisper White (100730), Chocolate Chip (102128), Kiwi Kiss (111353), Pink Passion (102762) Accessories: Button Bouquet (112092), Trio Flower Punch (109183) Recipe for Embossed Card: Stamps: Fifth Avenue Floral (113734) Ink: Chocolate Chip (100908), Pink Pirouette (111838) Paper: Whisper White (100730), Pink Pirouette (111351), Chocolate Chip (102128) Accessories: Textured Impressions Manhattan Flower Die (114517), Big Shot (113439), Chocolate Chip Taffeta Ribbon (109065)