Wednesday, July 22, 2009

Baby Quilt Card

Last night my sister and her husband had a little celebration to announce that they are expecting a baby boy! We couldn't be more excited for them. I needed a card for the celebration, and since I didn't know what they were having when I made it, I decided to go for a combination of pastels.

My inspiration was a baby quilt that I received at one of my showers a couple years ago.

Here are some specifics on the card:
  • This card has a 5.5"x5.5" base of Chocolate Chip. A 5.25" square of Certainly Celery textured card stock was added next.
  • A 2.75" square of Whisper white was given a dotted texture using my Big Shot and the Cuttlebug Swiss Dots folder. It was layered onto mats of Certainly Celery and Chocolate Chip.
  • This cute little bear is from Cute & Cuddly. I inked him up in Black StazOn and stamped it onto Watercolor paper. I used Watercolor pencils to draw lines in the darker areas of the bear, and blender pens to pull the color in towards the lighter areas. The bear was attached to the white square using Stampin' Dimensionals.
  • 5 1" squares were cut out of both Bashful Blue and Pretty in Pink. All of the squares were "texturized" using the Argyle Cuttlebug Folder and my Big Shot. Each square was attached in a checkerboard pattern onto the Certainly Celery.
  • A skinny Whisper White scallop border was used to conceal the top line of the "quilt".
  • Whisper White Taffeta Ribbon was added down the middle of the squares and tied off to the side.
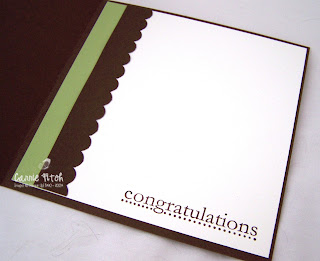
  • The sentiment was first stamped onto Whisper White using Certainly Celery and Chocolate Chip markers. It was stamped again onto Certainly Celery. The two were paper pieced together using dimensionals.
  • The inside of the card was dressed up using Whisper White, Chocolate Chip, and Certainly Celery. The "congratulations" stamp is from a SAB set.

Don't forget that this week only you can purchase the Styled Vanilla Hodgepodge Hardware for only $18.99!


Order Stampin' Up! online 24-7! Click Here!


Recipe:
Stamps: Cute & Cuddly (113682), SAB Set
Ink: Certainly Celery, Chocolate Chip (100071), Black StazOn (101406)
Paper: Chocolate Chip (102128), Soft Subtles Textured (108695), Whisper White (100730), Watercolor paper (105019)
Accessories: Big Shot (113439), Cuttlebug Swiss Dots Folder, Cuttlebug Argyle Folder, Scallop Edge Punch (112091), Stampin' Dimensionals (104430), Watercolor Pencils (101879), Blender Pens (102845), Whisper White Taffeta Ribbon (109070)

Monday, July 20, 2009

It's Mojo Monday time!


I am back after taking an extended weekend break with my hubby and little boy. We took some time to hit one of the water splash pads here in town and I also worked on some projects for our sons 2nd birthday and my Sister-in-laws upcoming baby shower. Its been a busy summer around our house!

The new Deal of the Week was announced this morning: Styled Vanilla Hodgepodge Hardware for only $18.99!! That is over a 30% savings (regularly priced at $29.95). Click here to order yours!

Here are some specific's on today's Mojo Monday Card (see sketch below):
  • The card started with a 5.5"x5.5" Soft Suede Base. A slightly smaller square of Old Olive was layered next.
  • Rich Razzleberry Patterns Designer Series Paper was cut into 5.25"x2.25" strips and attached to the Old Olive.
  • Soft Suede Polka Dot grosgrain ribbon was wrapped around the Old Olive.
  • Using my Circle Scissor Plus, I cut out two circles: a 3.5" Whisper White one, and a 4" Soft Suede one. TIP: The dial feature makes layering and measuring a breeze.
  • I colored directly onto the bird and branch stamp using SU markers in Soft Suede, Rich Razzleberry, and Old Olive. TIP: "Huff" on the stamp to moisten the ink.
  • The sentiment was inked up using Soft Suede and Rich Razzleberry markers and stamped onto Whisper White. It was then layered onto Rich Razzleberry.
  • A Clips Assortment paper clip and ribbon were added to the sentiment rectangle.
  • My favorite tool, the Big Shot, came out next. I used the Cherry Blossom embosslit with Rich Razzleberry to pop out the pretty flower. The 5-Petal Flower punch was used with Old Olive to create the look of leaves.
  • An Old Olive Playground button was attached in the center of the flower using a mini-glue dot. TIP: A tiny sliver of Soft Suede card stock makes for a cool matching "thread" for the button.

Now I am off to create another card for my sister who is also expecting!


Order Stampin' Up! online 24-7! Click Here!


Recipe:
Stamps: Wings of Friendship (114308)
Ink: Old Olive (100079), Rich Razzleberry (116329), Soft Suede (116329)
Paper: Soft Suede (115318), Old Olive (100702), Rich Razzleberry (115316), Whisper White (100730), Rich Razzleberry Patterns Designer Series Paper (115685)
Accessories: Big Shot (113439), Cherry Blossom Embosslit (114516), Playground Buttons (116313), 5-Petal Flower Punch (109041), Clips Assortment (112580), Soft Suede Polka Dot Grosgrain ribbon (115612), Circle Scissor Plus (112530), Glass Cutting Mat (112531)

Thursday, July 16, 2009

Christmas in July Card!

Last week I shared this project that I created for Splitcoast's Ways to Use It challenge. Here is a card that also qualifies, since it is clearly a Christmas card and it is still only July :-). It also follows the SC224 sketch (below).

This card took hardly any time to create. Here are some step-by-step instructions:
  • The first item I decided to use was the winter section from the Seasonal Pieces Window Sheets (new!). The rest of the card was drawn from that piece, including the size (it isn't a standard A2 piece).
  • I made a card base from Night of Navy so that the front would be slightly larger than the window sheet.
  • A 2"x4.5" piece of Brushed Silver came next. To keep within the sketch guidelines, I ran a piece of Whisper White taffeta down the center to give it the look of two pieces.
  • A rectangle of Bordering Blue went on the card next. I clipped all four corners with the ticket punch.
  • To attached the window sheet, I decided to add rhinestones to some of the snowflakes (they're are actually disassembled clear rhinestone brads) with glue dots, and then I placed another glue dot just below each one.
  • Another piece of Night of Navy served as a backdrop for my tree. I paper-pierced a border and attached it to the window sheet with more glue dots.
  • The tree, from Season of Joy, was heat embossed using Silver powder, snipped out, and attached to the card using dimensionals.
  • I isolated the sentiment from the rest of the image on the stamp by coloring directly onto the rubber with a Night of Navy SU marker. I popped it out using the Modern Label Punch and attached it to a frame of Night of Navy (this was created using my Big Shot and the Matchbox die). Another rhinestone in the center of the "o" in "season" finished it off!


Order Stampin' Up! online 24-7! Click here!

Recipe:
Stamps: Season of Joy (110384)
Ink: Night of Navy (102977), Versamark (102283)
Paper: Night of Navy (100867), Brushed Silver (100712), Bordering Blue (102630), Whisper White (100730)
Accessories: Big Shot (113439), Matchbox Die (114890), Whisper White Taffeta Ribbon (109070), Paper piercing tool (116631), mat pack (105826), Stampin' Dimensionals (104430), Mini Glue dots (103683), Clear Rhinestone brads (113144), Seasonal Pieces Window Sheets (115706), Modern Label Punch (116630), Heat Tool (100005), Silver Embossing Powder (109131), Ticket Corner punch (107214)

Wednesday, July 15, 2009

Big Bold Birthday Invite

My husband's 27th birthday is coming up in 2 weeks and he let me know last night that he would be game for having a little celebration (I LOVE to host parties, so I was ecstatic that he was up for one!). Of course that meant that I needed to {quickly} put together invites. This is the design I decided upon; cute, but basic. I admit that masculine cards are a real challenge for me, but he liked them so they are going out!

Here are the specifics:

  • The card has a Soft Suede base.
  • A 1" piece of Dusty Durango got a little dotted stripe using my paper piercing tool and mat pack. It was attached down the center of the card.
  • I cut two circles using my Circle Scissors Plus: a 5" circle out of Old Olive and a 4.75" circle of Bashful Blue.
  • The Bashful Blue circle took a trip through my Big Shot with an Argyle Cuttlebug embossing folder.
  • The circles were layered and attached to the card, with a large portion of it hanging over the edges. I flipped the card over and trimmed off the excess.
  • Whisper White, Soft Suede, Bashful Blue, and Dusty Durango took a ride through my Big Shot using the Big Bold Cupcakes Sizzlets.
  • The cupcake "holder" was given a more realistic look with the help of my paper crimper.
  • The sentiment is from a retired hostess set. It was inked using Soft Suede and stamped onto Whisper White. It was then popped out using the Word Window punch and layered onto an Old Olive Modern Label.

Don't forget that this week you can purchase the Square Fire Rhinestone Brads for only $6.99 (normally $10.95)!


Order Stampin' Up! online 24-7! Click Here!

Recipe:
Stamps: Retired Hostess Set
Ink: Soft Suede (115657)
Paper: Soft Suede (115318), Bashful Blue (105120), Old Olive (100702), Dusty Durango, Whisper White (100730)
Accessories: Big Shot (113474), Big Bold Cupcakes Sizzlets (114509), Paper Crimper, Paper piercing tool (116631), Mat Pack (105826), Word Window Punch (105090), Modern Label Punch (116630), Circle Scissors Plus (112530), Glass Cutting Mat (112531), Cuttlebug Embossing Folder

Tuesday, July 14, 2009

Birthday Wishes Gift Box

I saw a tutorial on the Stampin' Up! demonstrator site on how to make this box, so I had to try it! I wish I would have taken photos along the way, but I wasn't thinking. It really was so simple to make, I will list the step-by-step instructions at the end of this post.

This project falls under the guidelines of Splitcoast's color inspiration challenge CC227: Barely Banana, Lavender Lace, Basic Black (I used Basic Gray), and White. I threw in a little Old Olive for good measure :).

Let's start with the top of the box:
  • I started out with a 7"x7" square of Barely Banana and layered a 6.5"x6.5" piece of Basic Gray textured card stock.
  • The top note die cut is from The Write Stuff Specialty DSP. The Old Olive looks so cool in this color scheme!
  • A 4"x3.5" piece of Old Olive was used to cover the journal lines on the Top Note. Two Basic Gray Corduroy Brads dressed up the lower right.
  • Another 4"x2" piece of Basic Gray came next. I used a paper piercing tool and the SU mat pack to create an interesting border.
  • Whisper White Taffeta ribbon was tied around the Basic Gray piece before it was adhered to the top note.
  • The sentiment, from Garden Greetings, was inked up in Black StazOn and stamped onto Barely Banana. It was then popped out using the Word Window punch (it was a tight fit!).
  • The new Modern Label punch was used with Lavender Lace card stock for an interesting background for the sentiment.
  • I stamped the flower images, from Garden Greetings, onto Pale Plum, Lavender Lace, and Almost Amethyst (using Black StazOn). All of the flowers were snipped out and layered onto one another using dimensionals. TIP: The large flower actually has three layers!
  • Using my Big Shot, the Swirls Scribbles and Little Leaves dies, I cut out multiple die cuts from Old Olive.
  • The leaves and swirls were added first to the base, then the flowers were attached.

Here is an easy tutorial for the box:
  • Score a 12x12" piece of card stock at 2" on all four sides. This will be the lid.
  • There will be a square in each corner. Cut one side of each square (see template).
  • Fold the sides up, and the flaps in. Adhere the flaps to the inside of the box using sticky strip.
  • For the bottom, start by trimming 1/4" off of each side of 12x12" paper. The trimmed sides should meet in the corner. This will make it easier for the lid to fit over the bottom.
  • Again, score on all four sides- 2" in from the edges.
  • There will be a square in each corner. Cut along one side of each square according the the template provided.
  • Fold the sides up, and attach the flaps to the inside using sticky strip.


Now I just have to figure out what to put in it. Better yet, who should I give it to?!


Order Stampin' Up! online 24-7! Click Here!

Recipe: Stamps: Garden Greetings (113716) Ink: Black StazOn (101406) Paper: Soft Subtles Textured card stock (108695), Neutrals Textured card stock (108693), Old Olive (100702), The Write Stuff Specialty DSP (115674) Accessories: Big Shot (113439), Little Leaves Sizzlet (114511), Swirls and Scribbles Sizzlet (113441), Paper Piercing Tool (116631), Mat Pack (105826), Whisper White Taffeta Ribbon (109070), Basic Gray Corduroy Buttons (114345), Stampin' Dimensionals (104430), Sticky Strip (104294), Word Window Punch (105090), Modern Label Punch (116630)

Monday, July 13, 2009

Woohoo!!! My New Design is Here! And it's Mojo Monday!


What do you think of the new design? I LOVE it!!! Many thanks go out to Veronica McCollum at VKDesignCo for creating this awesome design! I'm so excited to have my site look a bit more polished and fun!

Today just keeps getting better because it is Monday. Which means that my favorite sketch was released this morning-the Mojo sketch!

I used a variety of new products for this card including Thoroughly Modern DSP, Wood Sheets, and the Chic Boutique Stamp Set.

Here's a rundown for the card:
  • The card started with a Soft Suede base with a layer of Kraft Thoroughly Modern DSP.
  • A 1" piece of striped DSP was added next, in keeping with the sketch.
  • Using my Big Shot, I "texturized" a piece of Soft Suede using the new Perfect Details Texturz plate. It was then matted onto Bermuda Bay card stock.
  • A fine polka dotted Rose Red print was matted onto another piece of Bermuda Bay.
  • I grabbed my Big Shot again and the Beautiful Butterflies Bigz die. I first ran a Soft Suede print through on a medium sized butterfly.
  • Next I ran a Wood Sheet (new!) through over one of the small butterflies. This went through so smoothly-I was amazed!
  • I used my Bermuda Bay SU marker to stain the wood. The photo does not do this justice! It looks so cool!
  • A Rose Red felt flower was attached to the center using a silver brad.
  • Rose Red double-stitched ribbon was wrapped around the top layers of the card (adhered behind the Kraft piece).
  • The frame from Chic Boutique was inked up in Bermuda Bay and stamped onto Very Vanilla. Using a Stamp-a-ma-jig, I was able to center the sentiment (inked in Rose Red).

The new Deal of the Week has been posted!

For this week only, you can purchase the Square Fire Rhinestone Brads at over 30% off! Regular price: $10.95, this week get them for $6.99!! Click here for details.


Let me know what you think of the card and new design!


Order Stampin' Up! online 24-7! Click Here!

Recipe:
Stamps: Chic Boutique (113744)
Ink: Bermuda Bay (115655), Rose Red (101778)
Paper: Very Vanilla (101650), Thoroughly Modern DSP (115673), Bermuda Bay (115317), Soft Suede (115318)
Accessories: Big Shot (113439), Perfect Details Texturz Plate (115962), Beautiful Butterflies Bigz Die (114507), Wood Sheets (116309), Accents and Elements Flower Fusion (110720), Rose Red 1" Double-stitched ribbon (111846), silver brads (104336), stamp-a-ma-jig (101049)


Saturday, July 11, 2009

For Sale: Retired SU! Sets and Miscellaneous Paper Crafting Items

I did a little "house cleaning" this weekend since the new 2009-2010 Catalog came out. Here are some items that unfortunately didn't make it into the new catalog (and also some other Non-SU items).

If you are interested in purchasing any of these items, please email me. PayPal and shipping is available.


Comfort Food Hostess Set $5 Pending


Frames with a Flourish $10 Pending


Monogram "F" $5


Country Blessings $8 SOLD


Seeing Spots $8 SOLD


Absolutely Fabulous $8


Kiwi Kiss Classic Ink Pad $2


Groovy Guava Classic Ink Pad $2 SOLD


Cool Caribbean Classic Ink Pad $2 SOLD


Tangerine Tango Classic Ink Pad $2 SOLD


Sizzix Die Cutting Machine w/cutting pad, System converter (for use with sizzlets and smaller dies), and 10 Pack of Adapters $20


Sizzix Carriage Originals Die $5


Lot of 4 Large Punches (2 Marvy punches- Large Square and Tag) 2 SU punches (Shapes and Flowers) $12


Lot of small and hand-held punches: Star hand-held (a little dirty on handle), Butterfly hand-held, 1/2" circle, small leaf, small flower, small teddy bear (unopened), 1/2" square, small swirl, 3/16" circle punch (longer to punch further into paper) $10 SOLD


EK Success Circle Cutter and Cutting Mat $3


Fiskars Shape Cutter and Circle Template $5