Thursday, October 29, 2009

PPA14: In PINK!

Today over at Pals Paper Arts, we are hosting a special "PINK" challenge for Breast Cancer Awareness month. This challenge is also in honor of Karol Harris. Karol is Kris Kilcoyne's mom (fellow designer for PPA), who is battling breast cancer.

In addition to all the beautiful pink projects, we are offering a huge lot of Stampin' Up! pink items for BLOG CANDY!! Be sure to upload your pink project to Pals Paper Arts to be entered to win!

My inspiration card for the challenge features one of my all time favorite color combination's: pink and black. I love all things that glitter and pretty much anything girly, which you can clearly see on this card!

  • This is a 5 1/2" square card of Whisper White.
  • A slighly smaller piece of textured Basic Black was layered first over the white.
  • A Pretty in Pink print from the Tea Party DSP served as a base for the rest of the card elements. TIP: I adhered this to the Basic Black at the very end so that I could wrap the ribbon around it.
  • A 2" Basic Black print from Nouveau Chic was placed near the bottom of the Pretty in Pink.
  • I used my Circle Scissor Plus to cut 2 circles: a 2 1/2" circle of Basic Black, and a 2 1/4" circle of Whisper White.
  • A little Pretty in Pink ink was sponged around the white circle.
  • The sentiment, from Wings of Friendship, was inked using a Regal Rose SU Marker and a Basic Black SU Marker. This was stamped off-center.
  • I decided to add some pink flowers to dress up the open space in the upper left of the circle. These were created using Regal Rose ink and the trio stamp from Eastern Blooms.
  • Dazzling Diamonds glitter was added to each flower before being snipped out (I waited for about a 1/2 hour for the glitter to dry).
  • Half pearls from the Pretties Kit were attached to two flowers using mini glue dots.
  • To add more dimension to the center flower, I used the 5-Petal punch to pop out a flower from Regal Rose. For a little more interest, I took the flower that I just punched out and put it back in the punch. Using my finger as a guide, I centered the flower in the punch so that the center of each petal would be punched.
  • The last snipped out flower was attached to the punched flower and a Sherbet Designer button was added on top.
  • Whisper White Organza ribbon was tied on the left side of the punch.
  • The last touch was to add a Pretties Kit hat pin to the ribbon.
Be sure to head over to PPA to upload your pink creation and be entered to win some awesome blog candy!!!


Order Stampin' Up! online 24-7! Click Here!

Recipe: Stamps: Eastern Blooms (111626), Wings of Friendship (114308) Ink: Regal Rose SU Marker (105108), Basic Black SU Marker (100082), Pretty in Pink (101301) Paper: Whisper White (100730), Basic Black Textured (Neutrals Assorted 108693), Nouveau Chic DSP (115670), Tea Party DSP (113992) Accessories: Pretties Kit (109114), Sherbet Designer Buttons (116312), Whisper White Organza Ribbon (114319), Circle Scissor Plus (112530), 5 Petal punch (109041), 2 way glue pen, Dazzling Diamonds Glitter (102023), Mini Glue Dots (103683), SU Dimensionals (104430)

Tuesday, October 27, 2009

Bermuda, Apricot, & Melon

Today's card features somewhat of an unconventional color palette. I felt like trying something new, and this color scheme is definitely new to me! Not sure if I like the overall card, but I decided to share anyway.

All of my projects this week will include a shade of pink in honor of Breast Cancer Awareness month, as well as our Pals Paper Arts PINK+Blog Candy challenge. Remember to check Pals Paper Arts on Thursday to upload your pink project and be included in the drawing for some pink BLOG CANDY!!! I will tell you right now that this blog candy is amazing and you wont want to miss out! This is all in honor of Karol Harris, the mother of Kris Kilcoyne (Kween Bee Kreations), who is battling breast cancer. Kris is a friend of mine, as well as a fellow designer for Pals Paper Arts.

Here are some specifics on today's card:
  • I started with a standard A2 card base of textured Apricot Appeal.
  • I inked up the Medallion stamp with Apricot Appeal and stamped it in the lower right corner of the card for a subtle background.
  • The large Pretties Kit flower was colored using a Melon Mambo SU marker. Next, I pressed a Versamark pad all over and heat embossed it using clear powder.
  • The center of the flower was created using a Circle Circus image with Melon Mambo ink. It was cropped using a 1 1/4" circle punch and attached to the center of the flower using dimensionals.
  • On the left side of the card, I used a strip of Melon Mambo Patterns Print DSP and a scallop border of Bermuda Bay.
  • 3 flowers were popped out of Bermuda Bay using the Trio Flower punch and attached using glue dots.
  • I dissected 3 Circle Ice Brads and used a mini glue dot to attach just the rhinestone portion in the flower centers.
  • The sentiment, from Razzle Dazzle, was inked in Bermuda Bay and stamped on Whisper White. I cut a "v" into the left side and attached it to the card. TIP: to create a "wavy" look, I placed a dimensional just in the center.
  • A library clip and Melon Mambo Polka Dot Grosgrain were added to the sentiment. TIP: I first folded the ribbon in half and secured it with sticky strip.

Again, I'm not so sure about this card, but after it was all said in done I decided that something was better than nothing! :)


Order Stampin' Up! online 24-7! Click here!

Recipe: Stamps: Medallion (115223), Razzle Dazzle (116714), Circle Circus (115778) Ink: Versamark *102283), Apricot Appeal (105128), Melon Mambo (115656), Bermuda Bay (115655) Paper: Whisper White (100730), Bermuda Bay (115317), Melon Mambo Patterns Pack DSP (115687), Apricot Appeal Textured (Soft Subtles Textured 108695) Accessories: Pretties Kit (109114), Clips Assortment (112580), Trio Flower Punch (109183), Circle Ice Rhinestone Brads (109111), Melon Mambo Polka Dot Grosgrain Ribbon (115611), Scallop Edge Punch (112091), 1 1/4" Circle Punch (104403), Dimensionals (104403), Mini Glue Dots (103683), Clear Embossing Powder (109130), Heat Tool (100005)

Saturday, October 24, 2009

Just had to share...

I decided to paint our pumpkins this year (after I found out that I am allergic to the inside). For those of you who have been following my blog for awhile, you know that my son is obsessed with Elmo, but he loves the other characters, too! Here are my creations (keep in mind that I DID use a picture as a guide):


Thursday, October 22, 2009

PPA13: Anything But A Card


Our challenge this week over at Pals Paper Arts is to create anything but a card. I have been a little obsessed with creating Christmas projects lately, so I couldn't help myself this week :).

This was SO easy to do! Obviously this will work with any stamp set, but I prefer to use more simple designs that can be repeated.

  • Start with the size candle you prefer, making sure that it is lighter in color.
  • Trim a piece of white tissue paper to wrap around the candle.
  • Stamp images onto the tissue paper. For my project, I used images from Season of Joy with Ruby Red and Old Olive. I also used a bit of gold paint to accent parts of the images.
  • Trim another piece of wax paper to fit around the candle, leaving a bit extra to hold onto.
  • Wrap the tissue paper around the candle, then wrap the wax paper on top of it, making sure to keep the tissue paper secure and smooth.
  • Hold onto the wax paper tightly to press the tissue paper up against the candle and heat with an embossing gun (heat tool). As soon as you see the tissue paper dissolve, move to the next area.
  • Remove the wax paper.
  • The tissue paper should disappear into the wax leaving only the image.
  • I also added some gold beads to some of the poinsettias using a hot glue gun.
I make these just about every year for gifts and they are so fun and easy! One thing to keep in mind, however, is that when the candle burns, the tissue paper will remain. So you may need to trim around the candle from time to time as it burns. But, to be honest, I never burn these candles. They are too pretty! I just leave them as is for decoration :).

Don't miss it! Next week we are hosting a special challenge for breast cancer awareness. Plus there will be some AMAZING blog candy!!!


Order Stampin' Up! online 24-7! Click Here!

Recipe:
Stamps: Season of Joy (110384)
Ink: Ruby Red (102259), Old Olive (102277)
Accessories: Heat Tool (100005)
Other: White pillar candle, tissue paper, wax paper, gold paint, gold beads

Tuesday, October 20, 2009

Christmas Quilt Card

I have been wanting to try this technique for awhile now, so I finally decided to give it a go. I will be honest- it is very time consuming! I didn't think it would take very long at all, but once I started, I figured I might as well finish. The stitching took 1 1/2 hours! Too long in my book!

But I do like how it turned out, so I thought I would go ahead and share anyway :).

  • First, I cut out a piece of Very Vanilla to measure 5"x4".
  • Next, I cut out 20-1" squares of a Merry Moments DSP print. I alternated each side to create a checkerboard pattern on the Very Vanilla. Each piece was adhered using Snail adhesive.
  • I used a paper piercing tool and the SU mat pack to pierce holes in a grid pattern over the squares along with a border.
  • Using a needle and off-white thread, I cross stitched through all the pre-made holes. TIP: No need to tie knots, simply use tape to secure the loose ends behind the piece.
  • I used glue dots to secure the "quilt" to a Very Vanilla card base. TIP: This started as an A2 card, but I needed to trim a little off the side for even spacing around the quilted piece.
  • The tag was created using a Big Shot, Real Red card stock, and the Two Tags Bigz Die.
  • A piece of the new Sleigh Bells ribbon was looped through the tag hole (This was a bit tricky. The best way I found to do this was to cut the end of the ribbon to a fine point, and pull it through the hole gently.)
  • Gold Elastic Cord was tied around the ribbon.
  • "Make Merry", from Berry Christmas, was gold heat embossed on the tag.
  • In keeping with the sewing theme, I added faux rick rack to the tag. I was able to create this using Garden Green card stock and the scallop edge punch. TIP: I started with a 1" piece of card stock and punched one side. Then I flipped the card stock over, lined up a scallop about half way through a scallop on the guide and punched the other side.
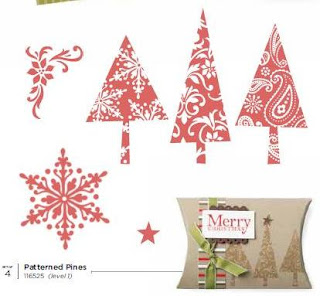
  • The tree, from Patterned Pines, was inked in Garden Green and stamped onto Very Vanilla. It was snipped out and attached with dimensionals.
  • The cute button is actually a retired Riding Hood Red button (close match though, huh?). I tied hemp twine through the button and attached it with mini glue dots.
Even though this card was time consuming, I had so much fun making it!


Order Stampin' Up! online 24-7! Click Here!

Recipe: Stamps: Patterned Pines (116525), Berry Christmas (116509) Paper: Very Vanilla (101650), Merry Moments DSP (115672), Real Red (102482), Garden Green (100702) Ink: Versamark (102283), Garden Green (102272) Accessories: Big Shot (113474), Two Tags Bigz Die (115954), Paper Piercing Tool (116631), Mat Pack (105826), Sleigh Bells Ribbon (116795), Elastic Gold Cord (109867), Gold Embossing Powder (109129), Heat Tool (100005), Snail (104332), Mini Glue Dots (103683), Dimensionals (104430), Scallop Edge Punch (112091), Hemp Twine (100982), Riding Hood Red button (retired) Other: Needle and Thread

Monday, October 19, 2009

Just Beclause!

I am loving this new Santa from the Holiday Mini. The writing on his suit and calendar on his bag are such cute touches.

I am making Christmas cards like crazy for the fair, and so I made this one last night. It took hardly any time to create.

Specifics:
  • This is an A2 card base of Real Red.
  • A slightly smaller layer of a Merry Moments DSP print came next.
  • The adorable Santa, from Just Beclause, was inked in Basic Black and stamped onto Whisper White. I used a blender pen and Real Red, Close to Cocoa, and Always Artichoke to fill him in.
  • He was snipped out and popped up on dimensionals.
  • The background for the Santa was made up of a 3" square Snowfall Window Sheet and Real Red, with a mat of Old Olive. TIP: I used glue dots to attach the window sheet only underneath the Santa.
  • The sentiment was inked in Basic Black and stamped on Whisper White. Elastic Gold Cord (new!) was wrapped around it before I popped it up using dimensionals.
  • Two Jumbo Chocolate Chip brads finished it off!
New Deal of the Week- Embellishments!


1/2" Library Clips
Regular $6.95
Sale $3.99
Basic Jumbo Grommets
Regular $6.95
Sale $4.49

Circle Designer Brads
Regular $5.95
Sale $3.99

Mini Library Clips
Regular $12.95
Sale $8.99

Be sure to go to my online store to take advantage of these awesome deals!


Order Stampin' Up! online 24-7! Click Here!

Recipe: Stamps: Just Beclause (116640) Ink: Basic Black (101179), Real Red (103133), Always Artichoke (105219), Close to Cocoa (103139) Paper: Whisper White (100730), Real Red (102482), Old Olive (100702), Merry Moments DSP (115672) Accessories: Snowfall Window Sheets (116805), Elastic Gold Cord (109867), 5/8" Chocolate Chip Jumbo Brads (112533), Stampin' Dimensionals (104430), Blender Pens (102845), Mini Glue Dots (103683)

Sunday, October 18, 2009

Divided Box Tutorial

I've received several inquiries about instructions for the boxes I created in yesterday's post. I decided to go ahead and do a step-by-step tutorial, which will hopefully eliminate any confusion.

UPDATE: I had a question about the lid, so I am including some quick instructions on how I did that. I simply drew another square in the middle of the unassembled box to measure approximately 3". Then I used a hobby blade and ruler to remove the square. A slightly larger piece of window sheet was adhered to the inside of the box using mini glue dots.

Step 1:
To create the box, cut a piece of card stock to measure 6"x6". Score at 1" in from all sides.


Step 2:
Cut along the score lines at the top and bottom (only) to create flaps for assembling the box.


Step 3:
Use sticky strip to secure the flaps to the interior of the box. I try to get the sticky strip as close to the fold as possible to prevent any gaps (see picture).


Step 4: Fully assemble the base. I use these same steps for creating the lid. It is a tight fit, so you may want to increase the card stock size and score lines slightly.


Step 5:
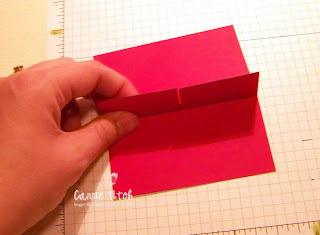
Cut two pieces of card stock to 4"x 6". On one of those pieces, score vertical lines at 2", 3", and 4". Score a horizontal line only between the three previously scored lines at the 2" mark (see
photo).


Step 6:
Fold the piece in half and cut along the middle line. You will need to cut this wide enough (about 1/16") so that the other piece will fit snugly inside when complete.


Step 7:
On the other 4"x6" piece, score at 2", 3", and 4" again. This time you will make a horizontal line at 2" on the outside of the other score lines.


Step 8:
Fold the piece in half and cut along the 2" line.


Step 9:
Accordion fold both dividing pieces. Use sticky strip to secure the middle piece together.


Step 10:
Secure the first dividing piece (the one pictured above) in the box. Slide the other piece over the top and secure.


I hope this helps! If you have any other questions, please feel free to email me.

Saturday, October 17, 2009

Craft Fair Creations

As I have mentioned in previous posts, I have been very busy lately preparing for my first craft fair. For the fair I will have about 200 cards (various themes) for sale as well as some gift tags (today's project), and gift packaging. I also plan on offering to create custom cards and invitations. My other reason for doing the craft fair is to share my love of Stampin' Up! You saw in a previous post the Decor Elements project I created for an example, and I also plan on offering catalogs and the option to host a workshop. I am hoping it will be a success!

The project I am showing today is some gift tag boxes. I used this template to create the box/lid and dividers. I used a hobby blade to cut a square out of the lid and placed Snowfall window sheets behind the opening. Then I filled each box (10 total) with 16 coordinating tags. Lastly, I tied each one with some ribbon.

The other project I am showing today is the sign I created to set up at my booth. I used paper, paint, and a thin piece of MDF to create a sign that mimics the look of my blog. Cute, huh? I love the glitter.

Wish me luck!


Order Stampin' Up! online 24-7! Click here!

Friday, October 16, 2009

A Birthday Party for my Mom

On the day before Halloween, my mom will be turning 50. So for about 6 months now, me, my sister, and my mom's best friend have been busy putting together her party.

You may be wondering why I am posting this. Well, initially it was going to be a surprise party (which you will see on the inside). But she accidentally found out about it so I am able to share the invite without having to worry that she'll see it. It actually works out better this way because we were having a hard time coming up with a way to get her to the restaurant without her becoming suspicious. Problem solved! :)

Here is how I made the invite:
  • This is a gate fold card. To create it, I took a 5 1/2" x 8 1/2" piece of textured Bermuda Bay card stock. It was scored 2 1/8" on both sides and folded into the center.
  • The Medallion image was inked up in Versamark and stamped off-centered (over the seam). It was then clear heat embossed.
  • Melon Mambo Polka Dot Grosgrain was added around the card and tied in the front. TIP: I used a piece of Melon Mambo card stock on the back of the card to help keep the ribbon secure.
  • Images from Great Friend were inked in Rich Razzleberry and Bermuda Bay and stamped onto Whisper White. I used a 1 3/8" circle punch to crop the images and layered it onto a Rich Razzleberry scallop circle.
  • I used a Crop-a-dile to punch a hole in the top of the tag.
  • Silver Elastic cord was used to tie the tag to the ribbon. Before knotting it, I added a Filigree Brad.
  • For the inside of the card, I used Razzleberry Lemonade DSP for the sides. The invitation information was printed off my computer.
  • The final touch was a Crushed Curry eyelet border at the bottom.
There are still a lot of small details to be done for the party, but it will be a wonderful celebration. One that is very needed in our family. A few weeks ago, my mom was diagnosed with MS and so we are trying to do everything we can to lift her spirits. Any prayers for peace and comfort would be greatly appreciated!


Order Stampin' Up! online 24-7! Click Here!

Recipe:
Stamps: Medallion (115223), Great Friend (113792)
Ink: Versamark (102283), Bermuda Bay (115655), Rich Razzleberry (115658)
Paper: Whisper White (100730), Bermuda Bay (115317), Rich Razzleberry (115316), Melon Mambo (115320), Crushed Curry (115319), Razzleberry Lemonade DSP (115675)
Accessories: Filigree Brads (112577), 1 3/8" Circle Punch (104401), Scallop Circle Punch (109043), Crop-a-dile (108362), Silver Elastic Cord (109866), Eyelet Border Punch (113692), Heat Tool (100005), Clear Embossing Powder (109130), Melon Mambo Polka Dot Grosgrain Ribbon (115611)

Thursday, October 15, 2009

PPA12: A Simple Sketch

This week at Pals Paper Arts, we are hosting a Simple Sketch challenge designed by the very talented Margaret Moody. Her designs are so well balanced which makes it incredibly easy to put together a quick card.


For my challenge card, I decided to use the Christmas Jingle Simply Scrappin' Kit. This meant that I didn't use any stamps, and all the paper was already included in the kit! Super easy.

  • For the card base, I used textured Chocolate Chip (A2).
  • Next, I layered two rectangles of the striped DSP included in the kit.
  • For the focal point, I used my Circle Scissor Plus to cut out a 3" Real Red circle.
  • The beautiful deer image is a self-adhesive die cut from the kit. I used dimensionals to pop it up on the Real Red. TIP: First, I put on several dimensionals on the back of the die cut. Then, with the backing still on the dimensionals, I sprinkled baby powder all over it to take away the stickiness. Then I simply removed the dimensional backing to attach it to the card.
  • A cute bow was formed out of 3/4" Real Red Polka Dot Grosgrain.
  • The finishing touch was to add some Latte and Playground Designer buttons. TIP: I used contrasting pieces of card stock for thread.
I plan to include this card in my craft fair inventory. I have been so swamped with creating more an more items for the fair that I haven't been able to post as much. But I do have quite a bit to share, so hopefully I will have a bit more time this week to post.

A Quick Reminder: Don't forget Stampin' Up!'s Deal of the Week promotion! For more details click here.


Order Stampin' Up! online 24-7! Click Here!

Recipe: Stamps: None Ink: None Paper: Christmas Jingle Simply Scrappin' Kit (115696) Accessories: Latte Designer Buttons (114333), Playground Designer Button (116313), Mini Glue Dots (103683), Stampin' Dimensionals (104430), 3/4" Real Red Polka Dot Grosgrain Ribbon (115608), Circle Scissor Plus (112530), Glass Cutting Mat (112531) Other: Baby Powder

Thursday, October 8, 2009

A Color Challenge- PPA11

This week over at Pals Paper Arts, we are hosting a color challenge! The goal is to use the following colors (or similar):


You will want to be sure to head over to Pals Paper Arts, not only to upload your own creation, but also to take advantage of some fabulous Blog Candy!!!

For my card, I incorporated a couple new techniques that I learned at the SU Regional. Both are so fun, and easy!

Here are some step by step instructions:

  • First I stamped the Halloween image from Sweet Centers on a square of Whisper White using Basic Black ink. I randomly filled in some of the images using Perfect Plum, Old Olive, and Pumpkin Pie.
  • The 1 3/4" circle punch was used to pop out the center.
  • On another smaller square, I stamped the image again using Perfect Plum ink. I filled in the center circle with Pumpkin Pie ink.
  • Now for the fun part! I adhered a piece of packing tape onto the back side of the large square, with the sticky part face up.
  • A generous coating of Dazzling Diamonds was added on top for a sheer glittery effect.
  • Next, I attached the two squares together.
  • For the card base, I used Perfect Plum, which I distressed using the distressing tool on my cutter kit.
  • I took a 2"x5.5" piece of Old Olive and distressed all the edges, too. Next I took out my Big Shot and SU Backgrounds I Texturz Plates.
  • I decided to use the diamond pattern, but I felt it needed something more. So I remembered another technique from Regionals- adding color to Texturz Plates!
  • I used a brayer to apply Basic Black ink to the raised portions of the plate. TIP: I wasn't as careful as I probably should have been and accidentally got ink in the impressed portion, but I ended up liking the look. Then I simply ran my card stock through. Another TIP: A little soap and water did the trick for removing the excess ink from my plate and silicon pad.
  • I knew I wanted to use the 1 1/4" Pumpkin Pie Striped Grosgrain, but it was a little too wide for the card, so I folded it in half and used Snail to secure it.
  • Then I wrapped the ribbon around the black rectangle (because I wanted to tie it, but not around the whole card).
  • Instead of a simple know, I used Hemp Twine to secure the ends.
I hope you will play along (and be entered to win Blog Candy!) over at Pals Paper Arts!!!


Order Stampin' Up! online 24-7! Click here!

Recipe: Stamps: Sweet Centers (116521) Ink: Basic Black (101179), Old Olive (102277), Perfect Plum (101437), Pumpkin Pie (105216) Paper: Whisper White (100730), Perfect Plum (101889), Old Olive (100702), Razzleberry Lemonade DSP (115675) Accessories: Big Shot (113439), Stampin' Up! Backgrounds I Texturz Plates (114512), 1 1/4" Pumpkin Pie Striped Grosgrain (115616), Hemp Twine (100982), Dazzling Diamonds Glitter (101023), 1 3/4" Circle Punch (112004), Packing Tape, Cutter Kit (106958), Brayer (102395)