 I've received several inquiries about instructions for the boxes I created in yesterday's post. I decided to go ahead and do a step-by-step tutorial, which will hopefully eliminate any confusion.
UPDATE: I had a question about the lid, so I am including some quick instructions on how I did that. I simply drew another square in the middle of the unassembled box to measure approximately 3". Then I used a hobby blade and ruler to remove the square. A slightly larger piece of window sheet was adhered to the inside of the box using mini glue dots.
Step 1:
To create the box, cut a piece of card stock to measure 6"x6". Score at 1" in from all sides.

Step 2:
Cut along the score lines at the top and bottom (only) to create flaps for assembling the box.

Step 3:
Use sticky strip to secure the flaps to the interior of the box. I try to get the sticky strip as close to the fold as possible to prevent any gaps (see picture).

Step 4: Fully assemble the base. I use these same steps for creating the lid. It is a tight fit, so you may want to increase the card stock size and score lines slightly.

Step 5:
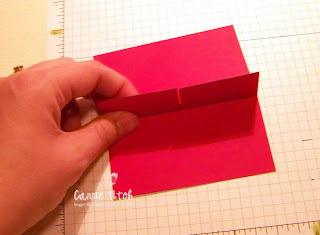
Cut two pieces of card stock to 4"x 6". On one of those pieces, score vertical lines at 2", 3", and 4". Score a horizontal line only between the three previously scored lines at the 2" mark (see
photo).

Step 6:
Fold the piece in half and cut along the middle line. You will need to cut this wide enough (about 1/16") so that the other piece will fit snugly inside when complete.

Step 7:
On the other 4"x6" piece, score at 2", 3", and 4" again. This time you will make a horizontal line at 2" on the outside of the other score lines.

Step 8:
Fold the piece in half and cut along the 2" line.

Step 9:
Accordion fold both dividing pieces. Use sticky strip to secure the middle piece together.

Step 10:
Secure the first dividing piece (the one pictured above) in the box. Slide the other piece over the top and secure.

I hope this helps! If you have any other questions, please feel free to email me.


7 comments:
I am printing this off as we speak! Thanks so much for taking the time!
Thanks, Carrie. Extra helpful!
This is awesome! Thank you so much!!
Since I am a dork at things, could you possible post instructions on making the top with the middle cut out too?
Thanks for what you have done!! I really appreciate it.
Your tutorial is wonderful... Hugs,
Excellent tutorial and photos. I hope you posted this to SCS (the tutorials section). I'm sure more inquiring minds would like to know.
Hugs, M
Thank you, thank you, thank you!!! I need a "gift" for a gift exchange w/ my uplines team. This is just what I was looking for. Thank you for taking time to put together this tutorial, it was VERY helpful ;)
-Laurie
thanks for the tutorial; got it on the SU website, but my printer doesn't work, and I needed dimensions. tFS Love it!
Post a Comment