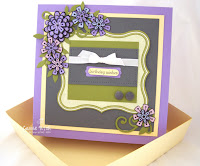
 I saw a tutorial on the Stampin' Up! demonstrator site on how to make this box, so I had to try it! I wish I would have taken photos along the way, but I wasn't thinking. It really was so simple to make, I will list the step-by-step instructions at the end of this post.
This project falls under the guidelines of Splitcoast's color inspiration challenge CC227: Barely Banana, Lavender Lace, Basic Black (I used Basic Gray), and White. I threw in a little Old Olive for good measure :).
Let's start with the top of the box:

- I started out with a 7"x7" square of Barely Banana and layered a 6.5"x6.5" piece of Basic Gray textured card stock.
- The top note die cut is from The Write Stuff Specialty DSP. The Old Olive looks so cool in this color scheme!
- A 4"x3.5" piece of Old Olive was used to cover the journal lines on the Top Note. Two Basic Gray Corduroy Brads dressed up the lower right.
- Another 4"x2" piece of Basic Gray came next. I used a paper piercing tool and the SU mat pack to create an interesting border.
- Whisper White Taffeta ribbon was tied around the Basic Gray piece before it was adhered to the top note.
- The sentiment, from Garden Greetings, was inked up in Black StazOn and stamped onto Barely Banana. It was then popped out using the Word Window punch (it was a tight fit!).
- The new Modern Label punch was used with Lavender Lace card stock for an interesting background for the sentiment.
- I stamped the flower images, from Garden Greetings, onto Pale Plum, Lavender Lace, and Almost Amethyst (using Black StazOn). All of the flowers were snipped out and layered onto one another using dimensionals. TIP: The large flower actually has three layers!
- Using my Big Shot, the Swirls Scribbles and Little Leaves dies, I cut out multiple die cuts from Old Olive.
- The leaves and swirls were added first to the base, then the flowers were attached.
Here is an easy tutorial for the box:

- Score a 12x12" piece of card stock at 2" on all four sides. This will be the lid.
- There will be a square in each corner. Cut one side of each square (see template).
- Fold the sides up, and the flaps in. Adhere the flaps to the inside of the box using sticky strip.
- For the bottom, start by trimming 1/4" off of each side of 12x12" paper. The trimmed sides should meet in the corner. This will make it easier for the lid to fit over the bottom.
- Again, score on all four sides- 2" in from the edges.
- There will be a square in each corner. Cut along one side of each square according the the template provided.
- Fold the sides up, and attach the flaps to the inside using sticky strip.


Now I just have to figure out what to put in it. Better yet, who should I give it to?!

Order Stampin' Up! online 24-7! Click Here!
Recipe: Stamps: Garden Greetings (113716) Ink: Black StazOn (101406) Paper: Soft Subtles Textured card stock (108695), Neutrals Textured card stock (108693), Old Olive (100702), The Write Stuff Specialty DSP (115674) Accessories: Big Shot (113439), Little Leaves Sizzlet (114511), Swirls and Scribbles Sizzlet (113441), Paper Piercing Tool (116631), Mat Pack (105826), Whisper White Taffeta Ribbon (109070), Basic Gray Corduroy Buttons (114345), Stampin' Dimensionals (104430), Sticky Strip (104294), Word Window Punch (105090), Modern Label Punch (116630)


9 comments:
I love what you did with this box, Carrie! So pretty! Also, I love the new look of your blog! So stylish and fun! Congrats!
I love this box! Thanks for sharing it and the recipe. It's stunning!
Good Lord! I have this set and never made anything like that before with it!
Love those colors!
I have wanted Garden Greetings for a long time now ... you really worked it beautifully.
Ohh my! SO beautiful! Don't give it away - keep it for yourself! ;)
This is box is great!!! Love the flowers, the buttons, the top note, all of it. Fabulous. I'm gonna try one too. Hugs,
This is my first official to your new blog look. Absolutely modern and cool! Gorgeous box with amazing flowers. Hugs, Mary
Adorable box - one lucky recipient whom ever it may be :) Carrie - you new design is AWESOME!! Love your creative title - and your banner is so chic!! Don't 'know' you well, but it seems to totally fit you!
Over the top adorable! I have to look up these supplies! You did a fantastic job, Carrie! What a fun project that would be for a camp/workshop!
Post a Comment