Saturday, February 28, 2009
Embrace Life
I absolutely love the set Embrace Life (as you can see in my first post). When I see this set, I can't help but picture using pink card stock or ink with it (my absolute fav). I assure you that all Stampin' Up! sets are very versatile to use with many colors. I am just one who loves pink. So what better than to choose the In Colors Pink Pirouette, Riding Hood Red, and Kiwi Kiss as my main color scheme? The cards starts out with a Very Vanilla base. Riding Hood Red is layered over the vanilla. Fiskars scallop edge scissor created the border on the right using Kiwi Kiss. NOTE: My next order will most certainly include the scalloped edge punch from SU!. TIP: Unless you have incredible skills (any Napoleon Dynamite fans out there? I just had to laugh at that) it can be challenging to keep the scallops consistent. Invest in the punch; it makes it a breeze. A strip of Pink Pirouette was stamped with the large flower from Embrace Life using Pink Pirouette ink. This creates a soft, subtle image. It's reminiscent of designer paper (a ton of new DP will be included in my next order, also!). A masking technique was used to create the main images on Very Vanilla. The large flower was stamped twice onto some scrap paper. Both images were then cut out into what are called masks. The same flower was inked again in Close to Cocoa and stamped onto the Very Vanilla square. One of the masks was used to perfectly cover the newly stamped flower. TIP: It may be helpful to use a tiny bit of Snail adhesive to lightly adhere the mask to the new image to prevent shifting when stamping over it. Another large flower was stamped partially over the first one, but the mask prevented the image from crossing over onto it. Both masks were used to cover each flower to stamp the greenery. The flowers and greenery were then watercolored using a blender pen with Pink Pirouette and Kiwi Kiss Ink. TIP: To watercolor using a stamp pad, press the pad into the lid (while it is still closed). This will create a pool of ink in the lid that you can dip your blender pen into. If you would like to switch colors with the blender pen, use a scratch piece of paper to wipe the pen onto. Once it starts to run clear again, you can use another ink. This lovely frame from Frames With a Flourish was inked in Kiwi Kiss and stamped onto Very Vanilla. The sentiment fit nicely inside using a stamp-a-majig. The frame was then cut out and popped up on dimensionals. The card was finished off using cream half back pearls lined up in a row.
Friday, February 27, 2009
Oops!
Thursday, February 26, 2009
Retired Sets for sale- huge savings!!!
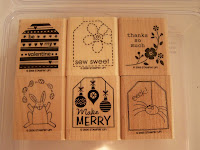
If you are new to stamping and want to get a collection going, this might be just the ticket to get you started. Or, if you are like me and love a good deal on stamps, these gently used retired stamps are a great buy! I have 67 sets listed below. Some of the sets have been used and do show some signs of wear (staining from using dark ink on rubber or wood). And some of them have not even been used at all. I guarantee that all of the stamps will still work perfectly!
If there is a particular stamp set you have a question about, feel free to email me. Most of these sets were originally introduced by Stampin' Up! before they started die-cutting all the sets. TIP: If you would like to trim the rubber differently than it already is, or reposition it, you can do so by popping the stamp (rubber side up) in the microwave for 10 seconds. This will allow you to safely peel the image off the wood and make any necessary changes. It should easily stick back on the wood after making the change.
If you would like to purchase any of the sets listed, you may email me. Shipping charges may apply depending on where you live. I am able to accept PayPal, or can make arrangements for another form of payment.
Okay, here we go in alphabetical order:
Alphabet Appeal Lower - $7
Alphadots - $7
Bold Butterfly - $7
Flower Filled - $7
Fresh Flowers - $5
Fun Filled - $5
Love Without End - $7
Merci - $3
Ornamassortment - $5
Perfect Ending - $3
Sweet on You - $3
Tags So Much - $5 SOLD
Wednesday, February 25, 2009
Cheep Talk
I am in love with this charming set called Cheep Talk. The birds and retro pear are too adorable. This card was inspired by the Split Coast Challenge SCS217.
Note: From now on, you will find the stamp set used in the card at the bottom of each post.
Very Vanilla CS was stamped repeatedly with the branch stamp using Chocolate Chip ink. TIP: To make some branches lighter, I stamped a branch with full ink, and stamped it again without re-inking. The little bird was filled in (by coloring on the rubber itself) using Stampin' Write Markers in Cameo Coral, Chocolate Chip, and Pumpkin Pie (the beak). TIP: When filling in the stamp with SU Markers, you will want to "huff" on the stamp to moisten the ink before pressing it to paper.
The sentiment was stamped using a Stamp-a-ma-jig. This is an awesome tool that will assist you in the placement of your stamped image exactly where you want it! TIP: There are several tutorials on using the Stamp-a-ma-jig online, but it is really quite simple to use. It does come with packaged instructions which were very easy to follow. The Stamp-a-ma-jig was also used to perfectly place each flower in the center of the Very Vanilla squares. Each flower was then finished off with a Turquoise Rhinestone Brad, and layered onto Cameo Coral. The squares were then evenly placed onto a strip of Tempting Turquoise CS. TIP: I usually don't measure the spacing when I place multiple items in a row (but you certainly can!). I typically just eyeball it. What makes this easier is to place the center item first and then do the other ones.
The Right side of the Tempting Turquoise strip is embellished with a small strip of Cameo Coral, and then using the Crafters Tool Kit, I was able to evenly punch a hole pattern on the edge.
Are you interested in hosting your own at-home workshop or catalog party? Now is the perfect time! With Sale-A-Bration in full swing, you can take advantage of earning free products for every $50 purchase (no limit!!!). Better yet, as a hostess you can earn even more on top of the regular hostess benefits!! Contact me when you decide what will work best for you! Don't worry if you live out of my area. I would be happy to send you a catalog for hosting a book party. Stampin' Up will ship to anywhere in the US!
Tuesday, February 24, 2009
Reason to Smile
Today's card was inspired by last week's Mojo Monday challenge. See the layout below, along with the website information.
I actually made this card for my mother-in-law's birthday using the butterfly from Reason to Smile (retired). I used Stampin' Write Markers in Regal Rose, Pale Plum, and Certainly Celery to randomly fill in the butterfly directly on the rubber stamp. This was stamped on Whisper White CS. TIP: Once the ink has been applied to the entire stamp, "huff" to moisten it before stamping. The butterfly was adhered to a piece of Regal Rose CS, and then Perfect Plum.
This card is full of layers. It starts with a Whisper White base, then Perfect Plum, followed by Certainly Celery- which was embossed using the Cuttlebug Birds and Swirls folder and a Sizzix machine using an adapter.
Two strips of Regal Rose (also embossed using the Cuttlebug Swiss Dots folder) are layered onto Perfect Plum. The sentiment Wish (Small Script- also retired) was stamped on Whisper White and punched out with a 1 3/8" circle punch. TIP: It is SO much easier to accomplish a perfectly placed image when punching, if you stamp first onto the cardstock, and then flip the punch upside down so you can see exactly how it will look once it is cut out. The sentiment was layered on a Perfect Plum scalloped circle (using the Scallop Circle punch).
The butterfly is embellished with three hot pink glittered circles to make up the body. I do not know the manufacturer for these, but I was able to find them at a Ben Franklin here in Cheney. To mimick the pattern for the butterfly and create balance, 3 rhinestones were placed in the upper left of the card. A light pink sheer bow was wrapped around the butterfly to tie it all together (no pun intended!).
Some notes: You may be wondering why I have posted retired products and stamps, along with non-Stampin' Up! products. Well, I recently signed up to be a demonstrator with Stampin' Up! again after taking a long break (7 months! I never wanted to leave but needed to under some new circumstances), and I have not yet received my start-up kit which will include tons of fun new products (Interested in joining too? Ask me how you can get started!). Rest-assured, any of the ideas you see here can be easily translated into another creation using more up-to-date products. Meanwhile, stay-tuned to see some exciting new things as I begin to share with you tons more from my favorite Card/Scrapbook/Home Decor supplier!
Don't Miss it!!! Stampin' Up is currently in the middle of Sale-a-bration! This means that with every $50 purchase, you will receive a free product (stamp set, rub-ons, ribbon, etc)!!!! For details and to view the online catalog click here. Let me know if you would like to make a purchase, or better yet, host a workshop and receive even more Sale-a-bration rewards on top of the awesome hostess benefits!!!
Monday, February 23, 2009
How I love Valentine's Day!
This is the card I made for my hubby this Valentine's Day. I know this is definitely not a masculine card, but I don't think that the pink/flowers/hearts rules should apply for this holiday.
I apologize in advance for the fact that I don't know the names of one of the papers and ribbon that were used!
The card (folded at the top) is a base of regal rose card stock, textured chocolate chip is next. I used a small scale scalloped edge scissor from Fiskars to dress up the whisper white card stock. The stitched swirl paper is from an unknown manufacturer (sorry!). The sentiment "Be Mine" is from Fancy Flexible Phrases (retired). This was inked in Chocolate Chip.
The On-board heart was first covered in regal rose CS, then sticky strip was applied and trimmed. With the entire heart covered with Sticky Strip, pink glitter is then applied.
The top of the card is finished with pink (could be identical to Regal Rose!) ribbon. A pretties kit hat pin, beads, and felt flower (all SU!) finish it off.
My cards need a home!
Today I decided that I need to start posting my cards somewhere that I can call my own. Every time I make a card for someone, I always take a picture and then never do anything with it! Hopefully this blog will serve as inspiration to other card makers! Any questions? Just ask.
This card was inspired by a Split Coast Stampers challenge called Ways to Use It. My "ribbon" is actually a small sliver of whisper white card stock zipped through my paper crimper and "tied" into a bow. This was topped off with a half-pearl from the Stampin' Up! Pretties kit.
Okay, okay. Instead of actually tying a bow, I simply looped two pieces to make the top, then I cut two pieces for the tails. This makes for a much more tailored final product (minus wrinkles and tears).
The card base is Certainly Celery card stock (all of my card stock is Stampin' Up!). Next I layered Barely Banana textured cardstock over Regal Rose, to create a tiny border. The flower from the Embrace Life stamp set (again, SU!) was stamped 3 times on the Barely Banana CS. I stamped this again onto Whisper White. I watercolored the images by pressing the Regal Rose pad into the lid. This creates a pool of ink, which I then picked up with a blender pen and filled in the flower. I popped these out with a 1 3/8th" circle punch and adhered them over the originals with Stampin' Dimensionals.
The sentiment (from Sincere Salutations) was stamped on Whisper White, layered on Regal Rose and cropped with a corner rounder punch. Two rhinestones (non-SU) finish it off and it is adhered with dimensionals.